I’m now blogging on a new site. Check out today’s post on Popover to Pippa’s

Hi All,
It’s been awhile since my last post, but that’s because I’ve been working on some upgrades and a new blog. Please continue to follow me at my new blog, Popover to Pippa’s!
I’m looking forward to seeing you all there!
Happy Cooking,
Pippa

What began as a quest for Chicken Chili ingredients last Sunday, turned into a lobster feast for two. I guess you could say that Brian and I celebrated Valentine’s Day a few days early this year. I have the scars to prove it. I managed to burn my hand on scalding water (my fault) and I also pierced my finger with one of the claws on our large lobster (the lobster’s fault). Breaking apart a lobster is a messy business, there’s no way around it. The sweet meat inside however, is worth the labor.

Thankfully, I managed to cook our asparagus without any unfortunate bodily harm. We served our asparagus with sauce gribiche. Sauce gribiche is possibly one of my favorite sauces of all time, although it is really more like a vinaigrette. It is a classic French sauce that is traditionally made with chopped eggs, cornichons, herbs, and capers.

I first had sauce gribiche on our trip to France a few years ago at a well-known bistro in the 11th Arrondissement, Bistro Paul Bert. The sauce was served on beautifully steamed Spring Asparagus and I instantly fell in love. It’s tangy and lively, and it’s so simple to make at the last minute because you probably have most of the ingredients in your refrigerator or cupboard already.
The method is simple. Whisk together shallot, vinegar (red, white, or sherry vinegar), good extra virgin olive oil, a touch of Dijon mustard, plenty of salt and freshly ground pepper (seasoning is key to a good vinaigrette). Then add chopped hard-boiled eggs and herbs (I enjoy parsley, tarragon, chives and chervil in this sauce). I did not use cornichons or capers in this version, but you could add those as well. And that’s it! I typically serve asparagus with sauce gribiche as a starter, but it can also be a simple side dish. And don’t stop there, because this sauce also goes well with fish and grilled meat.


Happy Cooking,
Pippa
Asparagus with Sauce Gribiche
Serves 4
For the sauce:
For the steamed asparagus:

Did I make it in time for Valentine’s Day?! I know that I missed posting a Super Bowl recipe (I made this recipe for stuffed shells on Super Bowl Sunday… you should make it too, it was a hit in my house). I also made a Caesar salad using a new ingredient—silken tofu.
Caesar salad and chocolate mousse made with tofu?!! [GASP] I know, it’s so anti-dairy of me. I’m actually embarrassed to admit it. I think that I made up for it though by eating my weight in cheese last Saturday at a French Cheese & Wine class at Artisanal Premium Cheese Center (highly recommend). I’m still salivating over the fondue and the Fleur de Marquis, a soft sheep’s milk cheese that is encrusted with rosemary, fennel seeds and juniper berries. Our instructor assured us that eating cheese, especially sheep’s milk cheeses, will flatten our bellies. Needless to say, I’m planning to eat a lot more of it within the next few weeks and probably for the rest of my life until I reach my goal weight.
Where were we? Oh, silken tofu. My husband adores chocolate pudding and chocolate mousse but it took me awhile to warm up to it, I never liked it as a child. I think it might have been a texture thing, but I never got excited when other kids would bring in mud pots for their birthdays (you know, the kind with the chocolate pudding, worms and Oreo crumbles). I know, I’m weird…

Thankfully, I now like chocolate pudding, although I still don’t like anything with the work JELL-O in it. I don’t typically make a lot of mousse, but I’ve made quite a few variations of chocolate pudding in the past, typically using a combination of milk (2%), cocoa powder, chocolate, cornstarch, and sometimes eggs.
Now this recipe is great because it doesn’t take the typical 3 to 4 hours to cool in the refrigerator before you can eat it. I don’t know about you, but I am impatient and I also have an intense aversion to ice baths (I’m so over it after culinary school where we filled entire sinks to cool down stocks, day after day). Unlike traditional chocolate pudding, this chocolate mousse is ready to be eaten immediately!!! It will firm up considerably after a brief refrigeration period, but it’s not necessary. It’s also incredibly simple and quick to prepare, and relatively nutritious. It’s ready in less than 15 minutes, I promise.
So, if you are like me and haven’t planned an elaborate dessert in advance for your pudding-loving, chocolate-adoring Valentine this year, you can fall back on this recipe. It’s intensely chocolaty and sure to please (I mean really rich, I almost couldn’t finish my serving.. and this is coming from someone who has no problem polishing off 3 large slices of pizza followed by ice cream on occasion). It’s difficult to believe, but I may never go back to the dairy version.
Happy Cooking,
Pippa

Valentine’s Day Deep and Dark Chocolate Mousse with Heath Bar Crunch
Serves 2
Approx. cooking time: 15 minutes, start to finish

Friday Fixing: Week 3: Miso Glazed Sea Bass
When coming up with this week’s Friday Fixing, I tried to think of a recipe that I have made a handful of times. Bon Appetit published a recipe for Miso Glazed Sea Bass back in 2000, which I only first tried this year but enjoyed enough to make a few times for friends.
This marinade is sweet, salty and strong, which is why it is best used with a heartier fish, like Chilean Sea Bass or Black Cod (which is a cheaper and sustainable alternative to Chilean Sea Bass).
My favorite side dish with this recipe has been Heidi Swanson’s Otsu noodles (I leave out the tofu when I am preparing it as a side dish). I like pairing something simple, and slightly vinegary and acidic with the fish, which is on the sweeter side. However, there are many side dishes which would work well. Here are a few ideas.
Happy Cooking,
Pippa
Friday Fixing: Week 3
Entrée: Miso Glazed Sea Bass
Suggested Fixings

Do you like crunchy and thick cookies? Whenever I think of a chunky cookie, I remember the Pepperidge Farm Nantucket Chocolate Chip Cookies that my grandmother used to buy (I would surreptitiously take one or 2 from the package every time we visited her house). If you do like that, this recipe is definitely for you. And if not, well, it still may be worth a try. Let me explain.
I am actually a member of the chewy cookie fan club. In an ideal world, every cookie that I eat would be a warm, just-baked soft and chewy chocolate chip cookie. BUT, these cookies may be the exception to my chewy cookie rule.

This recipe is from Macrina Bakery’s newest cookbook, More from Macrina: New Favorites from Seattle’s Popular Neighborhood Bakery. I adapted the recipe slightly by using melted butter, and by ever-so-slightly reducing the sugar and butter content. I’ve seen a number of recipes that recommend using melted butter and resting cookie dough overnight before baking, so that’s what I tried here.

The result? Initially, I was slightly disappointed. I had not expected a crispy cookie (see above. I ♥ chewy cookies). But, as I kept nibbling away at my cookie, my disappointment quickly faded. The peanut butter, oat, and chocolate combination kept enticing me back for bite after bite. It was slightly salty, but also sweet, and sufficiently chocolatey (I increased the amount of chocolate chips in the recipe…what can I say, I love chocolate). I even grew to like the crispy texture, it was somehow more satisfying than its chewy counterpart, allowing me to indulge in one or two cookies without feeling the need to gobble up the entire tin of cookies in one or two sittings (you know what that means….more cookies for later in the week!).
Happy Cooking,
Pippa

Question of the Day? Do you prefer chewy or crispy cookies? What is your favorite type of cookie, homemade or store bought?
Oatmeal Chocolate Chip Peanut Butter Cookies
Makes about 30, 2-inch wide cookies
Hi there! For this week’s Friday Fixings post (see this post for background information), I’ve selected chicken saltimbocca, purely because I happen to be making chicken saltimbocca tonight for friends. In Italian, saltimbocca means “jump in the mouth”. Saltimbocca alla Romana is traditionally made by topping a veal cutlet with sage and prosciutto, but chicken is commonly substituted. Some recipes call for no sauce, others call for making a simple pan sauce with marsala wine, lemon, or chicken broth. I personally like to make a quick pan sauce using lemon juice and chicken broth. As I learned in culinary school, acid, salt, and fat are important components in a well-rounded dish. In this case, the lemon adds acidity, while the prosciutto provides the perfect ratio of salt and fat. The sage ads fragrance and an additional layer of flavor, don’t skip it and don’t buy dried sage, it’s my favorite part.
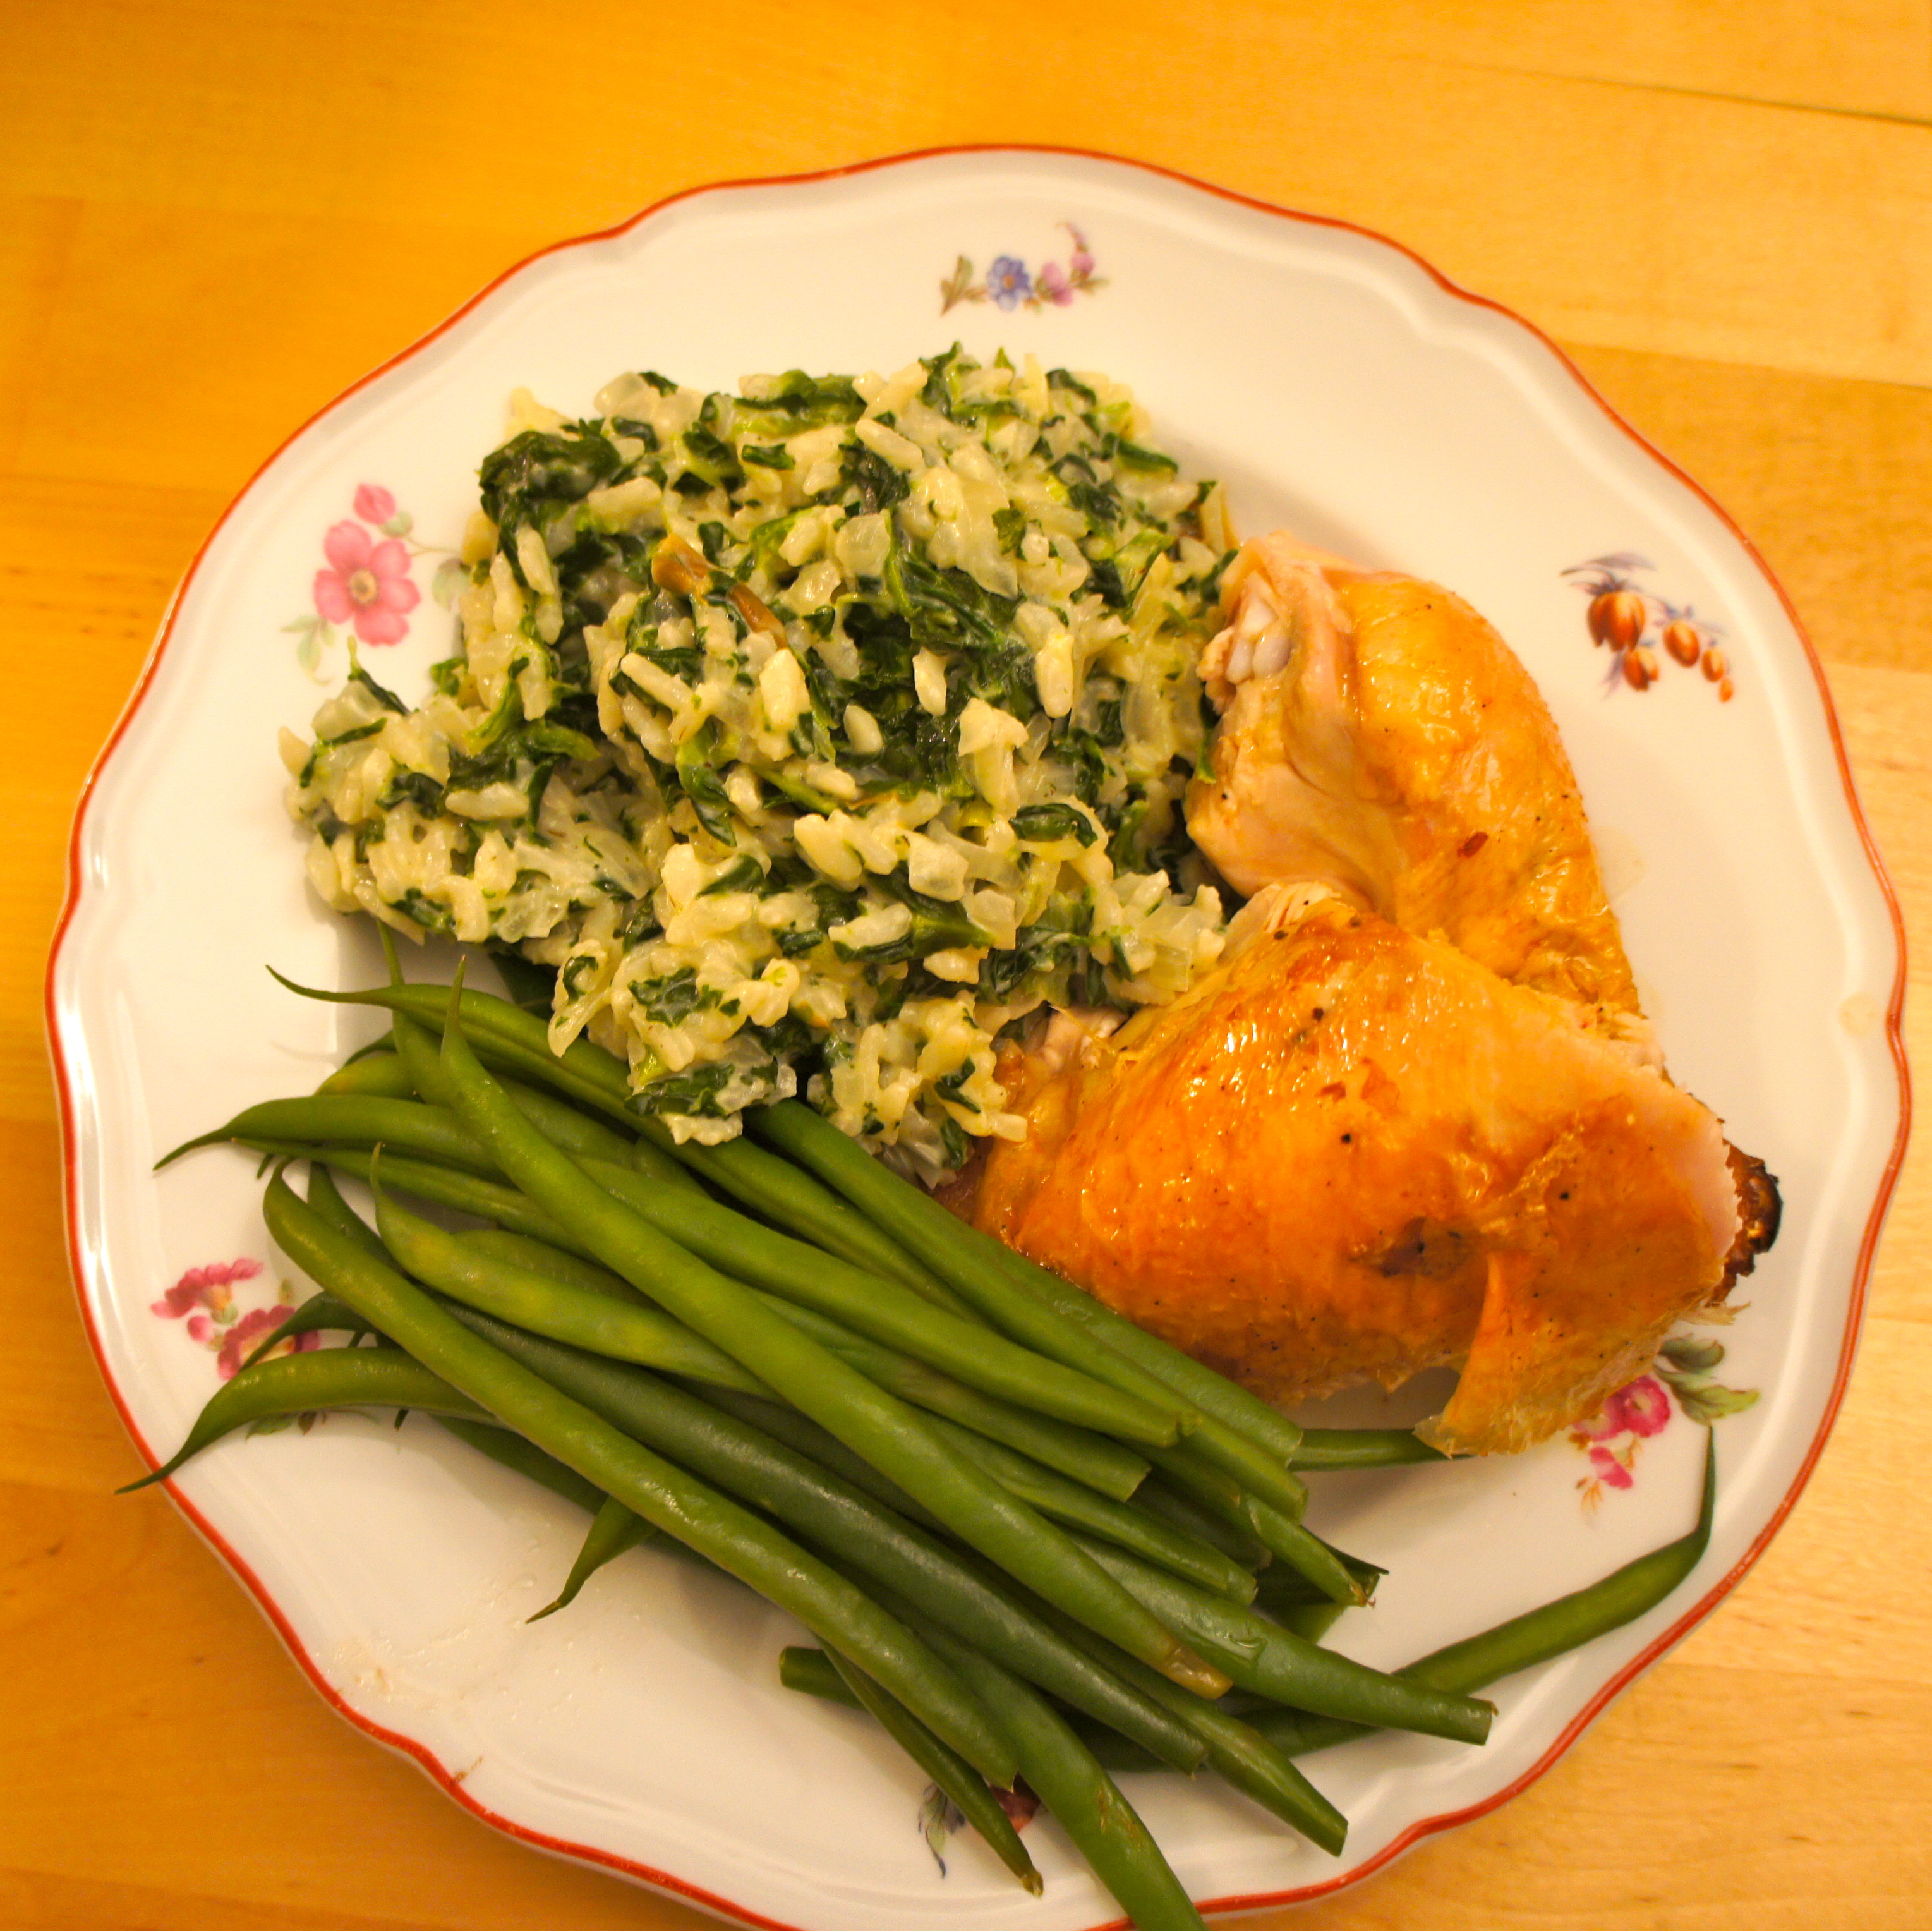
I most often pair chicken saltimbocca with soft polenta, but tonight I am making Deb Perelman’s Wild Rice Gratin with Kale and Caramelized Onions, from her cookbook, The Smitten Kitchen Cookbook. Because chicken saltimbocca incorporates only a few ingredients (chicken, sage, and prosciutto) I believe that it can go well with a number of different side dishes. For example, roasted potatoes, orzo, mashed potatoes, grits, etc. etc. The list below are a few sides dishes that I found this week that stand out to me. Enjoy!
Friday Fixing: Week 2
Entree: Chicken saltimbocca (an example recipe from Epicurious here)
Suggested Fixings:

Did I make it in time for the Super Bowl this weekend?! This may not be your typical Super Bowl fare, but I think that it meets the requirements. It’s a one-pot meal and it goes well with beer. What more could you ask for? Oh, bacon you say?… Don’t worry, that’s included too!
One of our favorite neighborhood restaurants in the city is Café D’Alsace. Dishes like charcroute garnie, duck sausage with sauerkraut, and tarte flambee are mainstays on the menu. It must be cold in Alsace, because the food here is hearty, rich, and meat-heavy. With temperatures barely reaching 20 degrees in New York last week, it’s exactly the sort of food that I was craving. However, bitterly cold temperatures also make me want to hibernate, so I decided to satisfy both my desire to stay out of the cold with my yearning for sauerkraut.

Enter chicken braised in sauerkraut! I was so excited to make this recipe, especially after I found large hunks of meaty bacon and sauerkraut at my local German grocer (Schaller & Weber for those of you who live in New York City). I started by slowly sautéing the bacon in a pan, allowing the fat to render out and the bacon to become slightly crispy. I debated pouring some of the fat out of the pan, but there wasn’t too much, and I figured that we could use a little bit of extra blubber to fend off the cold this winter. To the bacon, I added thin slices of sweet onion and a Granny Smith apple, which I slowly caramelized in the pan. After pouring in a hearty amount of Riesling wine, a can of drained mild sauerkraut, shredded fresh red cabbage, juniper berries, thyme, pearl onions and chicken broth, my kitchen smelled like a German beerhouse. As the cabbage braised, I browned boneless chicken thighs, added them to the cabbage, and also baked cookies. That is not a typo, I had made cookie batter the night before and after a proper rest in the refrigerator, (I have heard that is the key to great cookies) I figured why not wait, I had time while my cabbage braised. Let me just note that my small apartment kitchen now smelled like a cross between an Auntie Anne’s cookie shop and a Bratwurst stand. Weird, sort of like when I stumbled across a café in the West Village a few years ago called New York Hot Dogs & Coffee. Now, dogs and ketchup, dogs and pop, dogs and shakes—those all make sense to me. Dogs and coffee??? Needless to say, when I passed by the same location this summer, New York Dogs & Coffee had sadly closed. I guess even New Yorkers aren’t that adventurous when it comes to combo meals. Now, back to that chicken recipe…
I had to wait for my husband to get home from a cross-country trip to L.A., so my cabbage and chicken braised longer than I had originally intended. And herein lies the benefit of using chicken thighs. Unlike chicken breasts, they don’t easily become dry and overcooked, which is why I recommend using them when you are braising. Even though I cooked my chicken thighs at least 10 minutes longer than necessary, they remained tender and juicy. We ate our chicken and cabbage with homemade crusty bread and a salad dressed in simple vinaigrette, but you could also serve it with mashed potatoes or egg noodles (spaetzle would be great too). I should also note that this recipe is not comfort food in the sense of “I cannot move and must lie on my sofa for the next few hours while I digest”. It is bright and lively thanks to the sauerkraut and wine, and it will definitely warm you up on a cold night. It’s also perfect for a crowd (Super Bowl party anyone?).
Guten Appetit!
Pippa
Braised Chicken Thighs with Sauerkraut, Riesling, Apple and Bacon
Serves 4
Time: 1 ¼ – 1 ½ hours, including prep time

I had a revelation lat night as I sat on the sofa eating homemade Progresso Black Bean Soup for dinner. In my defense, I did manage to do some actual cooking prior to eating my soup, which involved making bread and baking some promising cookies (more on that later, if they in fact turn out to be good). Anyway, about that revelation…
It came about as I was thinking about various side dishes that might go well with tonight’s dinner. I was browsing the internet, as I often do for ideas (yes, even trained cooks and chefs browse the internet and cookbooks for inspiration), and determined that it can sometimes requires an exhausting amount of effort to find a simple side dish. Why, I’m not sure. But even mainstream publications like Food & Wine and Bon Appetit often confuse their readers by placing recipes like Soy-braised chicken and roasted brussels sprouts together on the same page. Both recipes sound good, but what should I make to go with the Soy-braised chicken? Surely not the brussels sprouts that are roasted with bacon and chestnuts?! When I look closely I do notice that there is a wine pairing for the chicken….So maybe if I drink enough of the wine I won’t notice that the brussels sprouts really don’t go well with the chicken?!!! Of course, this is just an example, and the intent of the magazine was not to tell you to make both of these dishes together, but it also never told you what might pair well with the chicken.
And alas, this is the point of my long, drawn-out tale. Let’s find a side dish (or “fixing”) that does pair well with our chicken. Every Friday, I’ll attempt to compile a list of side dishes that work well with a particular main course dish. And PLEASE, if you have any suggestions for side dishes for this week, or requests for future Fridays, please place them in the comments section!
Happy Cooking,
Pippa
Friday Fixing: Week 1
Entree: Simple Roast Chicken with Herbs (here’s an example recipe by Ina Garten, which has worked for me in the past)
Suggested Fixings:
Carbs:
Veg:


As the automatic doors opened for me at the San Diego airport this past Saturday, I felt immense joy. In part it was because we had finally arrived after a long five and half hour flight, also because I was in town to see one of my best friends getting married, and without a doubt because I was greeted by temperatures hovering around 70 degrees. I felt like I had stepped off the plane and landed on a tropical island.

New York has been dreary lately–clouds, clouds, and more clouds, with barely a hint of the sun. But this weekend I was granted a brief, two day reprieve from winter. On Saturday, I walked along the beach on Coronado Island, saw a beautiful sunset from the cliffs overlooking the Pacific Ocean, and watched as two Mexican women quickly and methodically made homemade tortillas that I would later eat with a large plate of carnitas and refried beans. Paradise.
Early on Sunday morning before the wedding, Brian and I walked along the beach and cliffs in La Jolla. We visited the “Children’s Pool”, which is a small beach populated by a group of very lazy and carefree seals and sea lions, and marveled at the number of Californians who were brazenly jumping into the ocean to swim laps in 10-foot waves and what we heard were shark-infested waters. I kid you not, they appear to do this every weekend, while I barely mustered up enough courage to dip my pinky toe in the ocean.

After our walk, we searched La Jolla for a good breakfast spot, and were lucky enough to stumble across Cody’s. We snagged a table outside before the line for brunch grew long, and enjoyed a delicious starter of ceviche with tortilla chips, followed by an omelette made with Sonoma chevre goat cheese, spinach, and wild mushrooms accompanied by sourdough toast.


The wedding that we attended was beautiful, and despite our 4:15am wakeup call the next morning, our weekend was well-worth the long trip to get there and back. This morning, as I walked to work in 20-degree weather with my long puffy jacket, hat and gloves, it was difficult to believe that I had sat by our hotel pool in only a bathing suit the day before. Back to reality, at least for the time being…

Happy Cooking,
Pippa
